| 11.18. Weave | ||
|---|---|---|

|
11. Artistic Filters |  |
The command is a Script-Fu script which creates a new layer filled with a weave effect and adds it to the image as an overlay or bump map. The result of the image looks as if it were printed over woven ribbons of paper, thin wooden sheet, or stripped bamboo.
If the image is in indexed colors, this menu entry is grayed out and unavailable.
This filter adds a „Multiply” mode layer upon the layer where you activate this command. The weave texture is rendered in gray levels.
For to make coarse mesh texture, increase the ribbon spacing and/or decrease the ribbon width.
For to strain ribbons hard, decrease the shadow depth.
With this option you can set the tape width in pixel between 0.0 and 256.0. In default, 30.0 pixels is set.
With this option you can set the distance to the neighboring ribbon or the size of black square hole in pixel between 0.0 and 256.0. In default, 10.0 pixels is set.
With this option you can set the darkness at crossings of lower ribbon in percentage. Lower value shows ribbons thinner. 75.0 percent is the default value.
With this option you can set the bent strength of ribbons in percentage. Higher value shows ribbons more wavy, lower value for flat surface. The actual effect is limited by the Shadow darkness. 75.0 percent is the default value.
With this option you can set the regularity of stripe texture. If this value is shorter than the summary of the ribbon width and twice of the ribbon spacing, the surface of ribbon becomes speckled. Set this value in pixel on range between 0.0 to 256.0. The default value is 200.0.
With this option you can set the density of fiber-like parallel short stripes on the surface of ribbons. To populate stripes increase this value. 50.0 percent is the default value.
With this option you can set the opacity of stripe texture. Lower value shows threads vague. To clear off threads set the value to 0.0 percent. The default value is 100.0 percent.
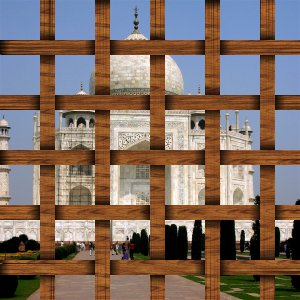
17.255. ábra - Adding a lattice using „Weave” texture

Narrower the ribbon width, wider the ribbon spacing, and filled with the „Wood #1” pattern.
This texture can be a lattice that you can see the original image through its mesh holes. Add a new, transparent layer over the active layer for the lattice, and apply this filter. Select a black regular square in the texture layer using the Select By Color tool, then delete black squares in selection on the texture layer to be chink holes. Reverse the selection, and activate the transparent layer so that you can fill the lattice surface with a pattern, then drag and drop your favorite pattern over the image window.