| 16.7. Optimize | ||
|---|---|---|

|
16. Animation Filters |  |
| 16.7. Optimize | ||
|---|---|---|
|
|
16. Animation Filters | |
An animation can contain several layers and so its size can be important. This is annoying for a Web page. The Optimize filters let you reduce this size. Many elements are shared by all layers in an animation; so they can be saved only once instead of being saved in all layers, and what has changed in each layer can be saved only.
GIMP offers two Optimize filters: Optimize (Difference) and Optimize (GIF). Their result doesn't look very different.
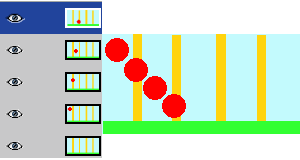
Original image
In this animation, the red ball goes downwards and past vertical bars. File size is 600 kB.
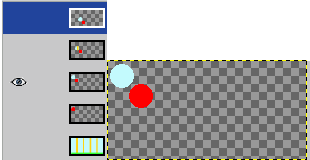
Optimize (Difference)
File size moved to 153 kB. Layers held only the part the background which will be used to remove the trace of the red ball. The common part of layers is transparent.
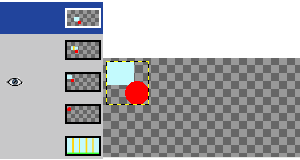
Optimize (GIF)
File size moved to 154 kB, a bit bigger in the present example, but layer size has been reduced. Layers held only a rectangular selection which includes the part of the background which will be used to remove the trace of the red ball. The common part of layers is transparent.
The „Unoptimize” filter removes any optimizations on a layer-based animation. You may need this command if you want to edit the animation and it's not possible or not useful to undo any changes and start editing from the original image.

