| 13.2. Bump Map | ||
|---|---|---|

|
13. Määritä-suotimet |  |
| 13.2. Bump Map | ||
|---|---|---|
|
|
13. Määritä-suotimet | |
Kuva 17.288. ”bump-map” example

On the left, the original image that we want to emboss: a solid blue. In the middle, the bump map : a grayscale image, where black pixels will emboss backwards and white pixels will emboss forwards. On the right, the bump-mapped image. The filter adds a shadow effect.
This filter creates a 3D effect by embossing an image (the card) and then mapping it to another image. Bump height depends on pixel luminosity and you can set light direction. See Emboss for more information about embossing. You can bump map any type of image, unlike the Emboss filter.
![[Huomaa]](images/note.png)
|
Huomaa |
|---|---|
|
These options are described in Kohta 2, ”Common Features”. |
Clicking on this button opens a small file browser with two panels. On the left panel, images present on your screen are listed: the active image is selected. On the right panel, you see the layers list of the active image: double click on the layer you want to use as a map for bump-mapping; the file browser is closed and a layer thumbnail appears in the Aux Input button.
The right panel has a ”Channel” tab: TODO
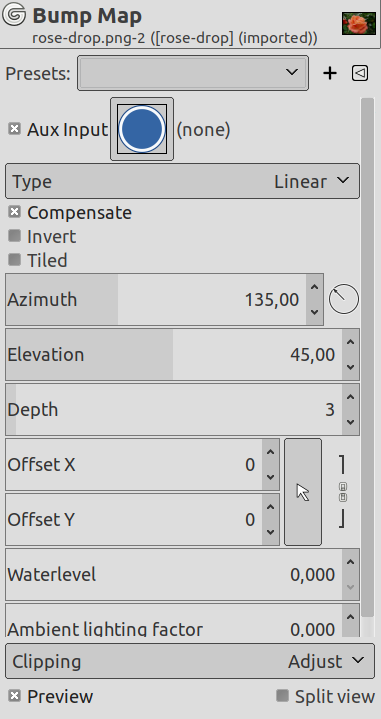
This option allows you to define the method that will be used when creating the map image:
Bump height is a direct function of luminosity.
Bump height is a spherical function of luminosity.
Bump height is a sinusoidal function of luminosity.
Bump-mapping tends to darken image. You can compensate this darkening by checking this option.
Bright pixels default to bumps and dark pixels to hollows. You can invert this effect by checking this option.
If you check this option, there will be no relief break if you use your image as a pattern for a web page: patterns will be placed side by side without any visible joins.
This is about lighting according to the points of the compass (0 - 360). East (0°) is on the left. Increasing value goes counter-clockwise.
That's height from horizon (0.50°), up to zenith (90°).
With this slider, you can vary bump height and hollow depth. The higher the value, the higher the difference between both. Values vary from 1 to 65.
With this slider, you can adjust the map image position compared with the image, horizontally (X) and/or vertically (Y).
If your image has transparent areas, they will be treated like dark areas and will appear as hollows after bump-mapping. With this slider, you can reduce hollows as if sea level was raising. This hollows will disappear when sea level value reaches 255. If the Invert bump-map option is checked, transparent areas will be treated as bright areas, and then Waterlevel slider will plane bumps down.
This slider controls the intensity of ambient light. With high values, shadows will fade and relief lessen.
We shall emboss an image with a text.
Open your main image.
Create the map: here a white text on black background.

The image and the map
Edit/Copy the map. Activate the image and Edit/Past as/New Layer. Right click on the new layer and apply Layer to Image Size to make the layer the same size as the image.
The map layer being active, apply a Gaussian Blur. Here, the default 1.5 pixels is used.
Make the map layer invisible and activate the image layer.
Open the ”Bump Map” filter. Click on the button and double-click on the text layer in the right panel.

Bump Map filter applied. Depth = 3. Ambient lighting factor = 0.326.