| 5.2. Tool Preset Editor | ||
|---|---|---|

|
5. Miscellaneous Dialogs |  |
| 5.2. Tool Preset Editor | ||
|---|---|---|
|
|
5. Miscellaneous Dialogs | |
You can access this dialog through:
a click on the button in the button bar of the Tool Presets Dialog.
a double-click on a preset icon in the Tool Presets Dialog.
a right-click on a preset in the Tool Presets Dialog to open a context menu and then click on the Edit Tool Preset command.
a click on the Save Tool Preset... button from the Tool Options Dialog
You can edit presets you have created only; all options of predefined presets are disabled. When you save a preset, it is stored in the first writable folder from the folder list set in → → → .
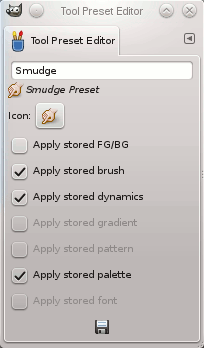
In this dialog you can:
edit preset name in text box,
change preset icon by clicking on preset icon. This opens a window where you can choose a new icon.
select resources to be saved by clicking on check boxes.
At the bottom of the dialog are buttons to save the settings of the current tool preset, and a reset button if you want to undo your changes.
The Tool Preset Editor has a context menu, that can be reached from the little triangle dock menu, then choosing . Besides two items that do the same as the save and restore buttons mentioned above, it only has one other option.