| 14.4. IFS Fractal | ||
|---|---|---|

|
14. Rendering Filters |  |
This fractal-based plug-in is truly wonderful! With this versatile instrument, you can create amazingly naturalistic organic shapes, like leaves, flowers, branches, or even whole trees. (“IFS” stands for “Iterated Function System”.)
The key to using this plug-in lies in making very small and precise movements in fractal space. The outcome is always hard to predict, and you have to be extremely careful when you change the pattern. If you make a component triangle too big, or if you move it too far (even ever so slightly), the preview screen will black out, or more commonly, you'll get stuck with a big shapeless particle cloud.
A word of advice: When you have found a pattern you want to work with, make only small changes, and stick to variations of that pattern. It's all too easy to lose a good thing. Contrary to what you might believe, it's really much easier to create a leaf or a tree with IFS Fractal than to make a defined geometrical pattern (where you actually know what you're doing, and end up with the pattern you had in mind).
For a brief introduction to IFS's see Foley and van Dam, et al,. Computer Graphics, Principles and Practice[FOLEY01].
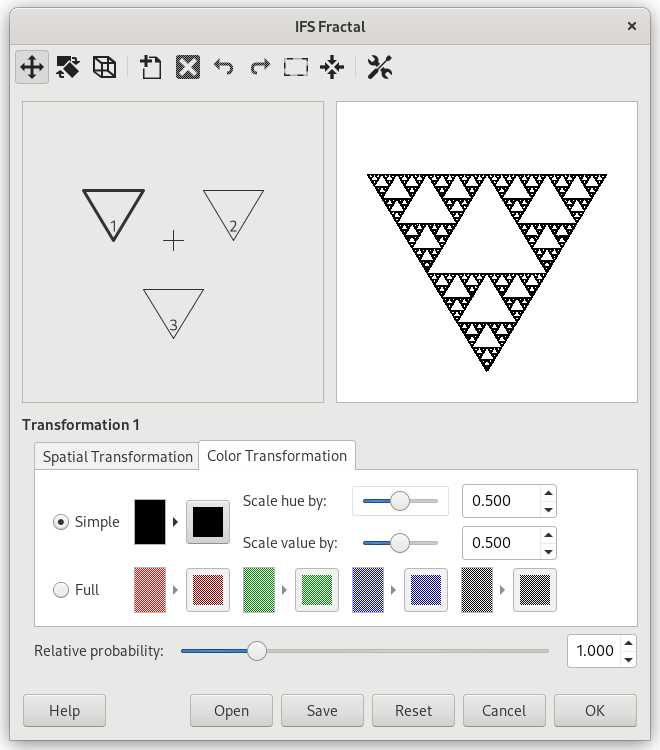
The plug-in interface consists of the compose area to the left, a preview screen to the right, and some tabs and option buttons at the bottom of the dialog. The Default setting (in the preview window) is three equilateral triangles. (This gives rise to a fractal pattern called the Sierpinski Triangle).
Toolbar
Click on the toolbar buttons to use the following tools, or open the context menu of the compose area.
Select the action to perform using the (mouse) pointer.
Add or remove fractals.
Standard.
Link fractals and let apply actions to all fractals.
Recompute the center of the fractals. This does not have any visible effect to the resulting fractal.
Enables you to speed up rendering time. This is especially useful when working with a large spot radius; just remember to use even multiples of the default value: 4096, 8192, 16384, ...
Determines how many times the fractal will repeat itself. (A high value for Subdivide and Iterations is for obvious reasons a waste of process time unless your image is very large.)
Controls the level of detail.
Determines the density of the “brushstrokes” in the rendered image. A low spot radius is good for thin particle clouds or spray, while a high spot radius produces thick, solid color strokes much like watercolor painting. Be careful not to use too much spot radius — it takes a lot of time to render.
Gives you information on the active fractal, and allows you to type a value instead of changing it manually. Changing parameters with the mouse isn't very accurate, so this is a useful option when you need to be exact.
Move, scale, or shear the active fractal.
Stretch the active fractal.
Flip the active fractal.
Color Transformation

Changes the color of the currently selected fractal component (default is the foreground color in the toolbox) to a color of your choice.
Like the Simple color transformation but this time you can manage the color transformation for each color channel and for the alpha channel (shown as a black channel).
When you have many fractals with different colors, the colors blend into each other. So even if you set “pure red” for a fractal, it might actually be quite blue in some places, while another “red ” fractal might have a lot of yellow in it. Scale Hue/Value changes the color strength of the active fractal, or how influential that fractal color should be.
Other
Determines influence or total impact of a certain fractal.
This is a rather complex plug-in, so to help you understand it, we'll guide you through an example where you'll create a leaf or branch.
Many forms of life, and especially plants, are built like mathematical fractals, i.e., a shape that reproduces or repeats itself indefinitely into the smallest detail. You can easily reproduce the shape of a leaf or a branch by using four (or more) fractals. Three fractals make up the tip and sides of the leaf, and the fourth represents the stem.
Before invoking the filter: Select → . Add a transparent layer with → → . Set the foreground color in the toolbox to black, and set the background to white.
Open IFS Fractal. Start by rotating the right and bottom triangles, so that they point upward. You'll now be able to see the outline of what's going to be the tip and sides of the leaf. (If you have problems, it may help to know that the three vertices of a triangle are not equivalent.)
Figure 17.335. Tutorial Step 2

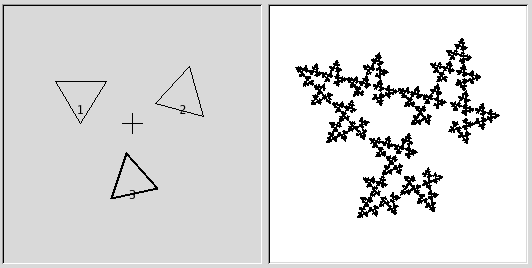
Start by rotating triangles 2 and 3, trying to keep them nearly the same size.
To make the leaf symmetrical, adjust the bottom triangle to point slightly to the left, and the right triangle to point slightly to the right.
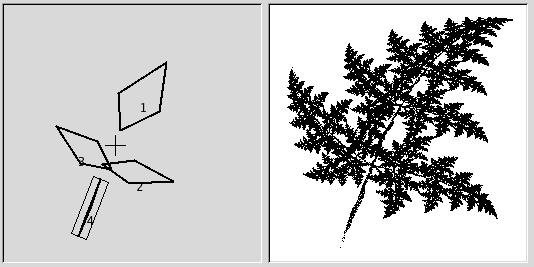
Press to add a component to the composition. This is going to be the stem of the leaf, so we need to make it long and thin. Press , and drag to stretch the new triangle. Don't be alarmed if this messes up the image, just use to adjust the size of the overlong triangle. You'll probably also have to move and rotate the new fractal to make it look convincing.
You still have to make it look more leaf-like. Increase the size of the top triangle, until you think it's thick and leafy enough. Adjust all fractals until you're happy with the shape. Right-click to get the pop-up menu, and choose . Now all components are selected, and you can scale and rotate the entire leaf.
Figure 17.337. Tutorial Step 4

Enlarge component 1, arrange the other components appropriately, then select all, scale and rotate.
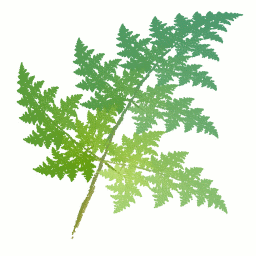
The final step is to adjust color. Click on the tab, and choose a different color for each fractal. To do this, check and press the right color square. A color circle appears, where you can click or select to choose a color.
Figure 17.338. Tutorial Step 5

Assign a brownish color to component 4, and various shades of green to the other components.
Press OK to apply the image, and voilà, you've just made a perfect fractal leaf! Now that you've got the hang of it, you'll just have to experiment and make your own designs. All plant-imitating fractals (be they oak trees, ferns or straws) are more or less made in this fashion, which is leaves around a stem (or several stems). You just have to twist another way, stretch and turn a little or add a few more fractals to get a totally different plant.