| 5. Miscellaneous Dialogs | ||
|---|---|---|

|
Chapter 15. Dialogs |  |
| 5. Miscellaneous Dialogs | ||
|---|---|---|
|
|
Chapter 15. Dialogs | |
The Tool Presets Dialog shows a list of all saved tool presets. Clicking on a preset opens the corresponding tool with its saved presets.
The “Tool Presets Dialog” is a dockable dialog; see the section Section 2.3, “Dialogs and Docking” for help on manipulating it.
You can access it:
from an image menu: → → ;
or, as a tab in Toolbox window, through → → .
This dialog comes with a list of predefined presets. Each of them has an icon representing the tool presets will be applied to and a name.
Presets can be tagged so that you can arrange presets display as you want. Please see Section 3.7, “Tagging” for more information about tagging.
Double-clicking on a preset icon opens the Tool Preset Editor.
Double-clicking on preset name allows you to edit this name.
At the bottom of the dialog appear four buttons:
Edit this tool preset: clicking on this button opens the Tool Preset Editor for the selected preset. You can actually edit presets you have created; predefined presets options are all grayed out and inactive. But you can create a new preset from a predefined preset and edit its options.
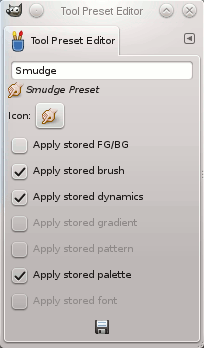
The Tool Preset Editor is described in Section 5.2, “Tool Preset Editor”.
Create a new tool preset: before clicking on this button, you can either select an existing preset, or select a tool in Toolbox, for example the Healing Tool which is not in the presets list. A new preset is created at the top of the dialog and the Tool Preset Editor is opened. Please see Section 5.2, “Tool Preset Editor”.
Save the active tool options to this preset: this saves the current tool settings to the selected preset.
Restore this tool preset: this restores the tool settings to the values saved in the selected preset.
Delete this tool preset: this deletes the currently selected preset. Note that this button is disabled for the default presets that come with GIMP.
Refresh tool presets: If you have added a preset manually in gimp/2.0/tool-presets folder, you have to click on this button to include it in the presets list.
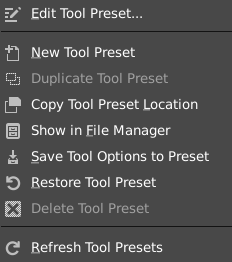
Right-clicking on the Presets Dialog opens a context menu where you find some commands already described with buttons: Edit tool preset, New tool preset, Save tool preset, Restore tool preset, Refresh tool presets. You also find two new commands:
Duplicate Tool Preset: this command is always disabled. It is not necessary since, as we saw above, a duplicate is automatically created when you create a new preset from an existing preset.
Copy Tool Preset Location allows you to copy the path of the selected tool preset to the clipboard.
Show in File Manager opens the location of the tool preset in the default File Manager on your system.


