| 3. Opening Files | ||
|---|---|---|

|
Chapter 5. Getting Images into GIMP |  |
| 3. Opening Files | ||
|---|---|---|
|
|
Chapter 5. Getting Images into GIMP | |
There are several ways of opening an existing image in GIMP:
The most obvious way to open an existing image is the menu. Use → to open the Open Image dialog,allowing you to navigate to the file and click on its name. This method works well if you know the name and location of the file you want to open. Although the Open Image dialog does have a preview pane, it is not convenient (easy) to find an image based on a thumbnail.
![[Note]](images/note.png)
|
Note |
|---|---|
|
While opening a file, GIMP must determine the file
type. Unfortunately, the file extension, such as
|
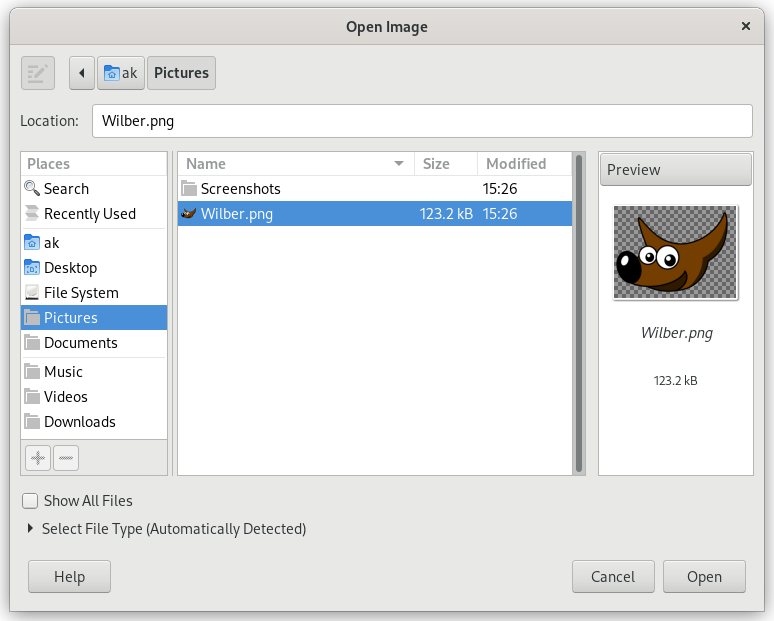
GIMP 2.2 introduced a new Open Image dialog that provides several features to help you navigate quickly to a file. Perhaps the most important is the ability to create “bookmarks”, or Places, for folders that you use often. Your list of bookmarks appears on the left side of the dialog. The ones at the top, such as “Desktop”, are provided automatically. Use the Add button to add the current directory to the list. Use the Remove button to remove the selected bookmark. Double-click on a bookmark to navigate directly to that directory.
The center of the dialog contains a listing of the contents of the selected directory. Subdirectories are shown at the top of the list, files below them. By default, all files in the directory are listed, but you can restrict the listing to image files of a specific type using the File Type selection menu that appears beneath the directory listing.
When you select an image file entry in the listing, a preview appears on the right side of the dialog, along with some basic information about the image. Note that previews are cached when they are generated, and there are some things you can do that may cause a preview to be incorrect. If you suspect that this may be happening, you can force a new preview to be generated by holding down the Ctrl key and clicking in the Preview area.
By default, a Location text box is present in the File Open dialog. It may be absent: the Ctrl+L key combination toggles this text box. Alternatively, you can click on the icon of the paper and pencil in the upper left corner to toggle the text box.
|
|
Note |
|---|---|
|
If you select a file name from the list, and click the “Open” button in the lower right corner or the dialog, it is almost always true that GIMP will automatically determine the file type for you. On rare occasions, mainly if the file type is unusual and the name lacks a meaningful extension, GIMP may fail to correctly identify the file type. Use Select File Type at the bottom of the dialog to manually specify the file type if this is required. More commonly, though, if GIMP fails to open an image file, it is either corrupt or not a supported format. |
If you select a PDF file to open, GIMP will show an extra dialog with options specific to this file type.
You can select pages by typing one or more page numbers or
ranges, separated by commas. For example, 4-7,9
selects pages 4, 5, 6, 7, and 9 of the document. The default is to
select all of the pages in the document.
If this is set to Images, then GIMP will open each of the selected pages as a separate image. If it is set to Layers, then GIMP will create one image with each of the selected pages in its own layer.
The size of the image created is controlled by the Width, Height, and Resolution settings. A PDF document contains information about its width and height in units of physical length so it is meaningful to set the width or height of the image in pixels or its resolution in pixels per physical unit of length: as you set any of these three parameters, the other two will automatically adjust to match.
Check this box to apply antialiasing to text in the image.
If you select a PostScript file to open, GIMP will show an extra dialog with options specific to this file type.
You can select pages by typing one or more page numbers or
ranges, separated by commas. For example, 4-7,9
selects pages 4, 5, 6, 7, and 9 of the document. The default is to
select all of the pages in the document.
Note: this is only visible if there is more than one page.
If this is set to Images, then GIMP will open each of the selected pages as a separate image. If it is set to Layers, then GIMP will create one image with each of the selected pages in its own layer. Note: this is only visible if there is more than one page.
The size of the image created is controlled by the Width, Height, and Resolution settings. A PostScript document contains information about its width and height in units of physical length so it is meaningful to set the width or height of the image in pixels or its resolution in pixels per physical unit of length: as you set any of these three parameters, the other two will automatically adjust to match.
Select B/W to have GIMP create the image as a 2-color indexed image, Gray for a grayscale image, or Color for an RGB image (see Section 1, “Image Types” for a full explanation of these different image modes). If you select Automatic then GIMP will try to determine the most suitable mode from the contents of the file.
If this is checked, GIMP will use the bounding box information in the PostScript file to determine how much of the page to use: effectively, this is equivalent to cropping whitespace from the edges of the image. It is possible for a PostScript file to contain no bounding box information, in which case this option will be ignored.
You can choose to have GIMP apply antialiasing separately for text and for graphics in the imported image. Either Weak or Strong antialiasing may be applied: usually you should select Strong.