| 3. Å opna filer | ||
|---|---|---|

|
Kapittel 5. Få bilete inn i GIMP |  |
| 3. Å opna filer | ||
|---|---|---|
|
|
Kapittel 5. Få bilete inn i GIMP | |
Det er fleire måtar å opna bilete i GIMP:
Den mest nærliggjande måten å opna eit bilete på er med kommandoen → . Det vil då koma opp eit dialogvindauge der du kan finna fram til biletfila og opna ho ved å klikka på filnamnet. Dette er vel og bra så lenge du veit namnet på fila og kvar ho er å finna. Sjølv om dialogvindauget også inneheld ei førehandsvising av biletet, er det ikkje alltid heilt enkelt å finna biletet på grunnlag av ein miniatyr.
![[Notat]](images/note.png)
|
Notat |
|---|---|
|
Når du opnar ei fil, må GIMP finna ut kva filtype dette er. Det er diverre ikkje nok berre å sjå på filutvidinga, som t.d. |
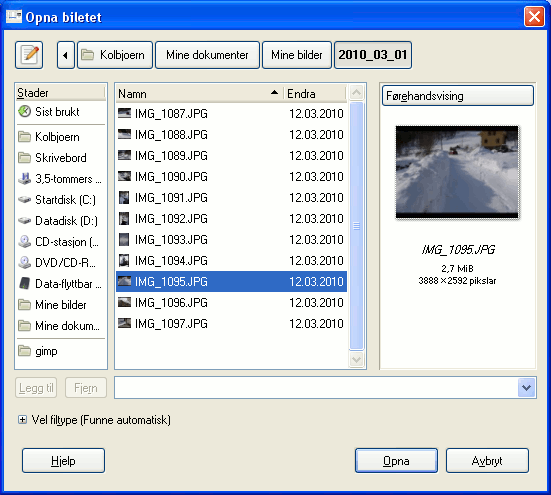
I GIMP 2.2 vart det teke i bruk eit nytt dialogvindauge, Opna bilete-som inneheld fleire funksjonar som hjelper deg med å navigera raskt til ei fil. Det viktigaste er kanskje høvet til å laga «bokmerke», eller Stadar for mapper du brukar ofte. Lista over bokmerke vert vist på venstre side av dialogvindauget. Dei øvste innslaga, for eksempel «Skrivebord», vert sette inn automatisk. For å leggja til den gjeldande mappa som bokmerke, klikkar du på knappen . Du fjernar eit markert bokmerke med knappen . Du kan enkelt opna ei mappe ved å dobbeltklikka på bokmerket.
I midten av dialogvindauget finn du ei liste over innhaldet i den valde mappa. Eventuelle underkatalogar vert lista øvst, og deretter filene. Normalt vert alle filene i mappa lista ut, men du kan avgrensa listinga til bestemte filtypar ved hjelp av utvalsmenyen «Vel filtype».
Når du merkjer ei biletfil, vert biletet vist som miniatyr til høgre i dialogvindauget saman med ein del opplysningar om biletet. Dette biletet vert lagt inn i eit snarlager. Er biletet forandra i mellomtida, eller du har mistanke om at miniatyren av andre grunnar ikkje viser det korrekte biletet, kan du laste det inn på nytt ved å halde nede Ctrl-tasten medan du klikkar på miniatyren.
Til vanleg vil det vera ein adresseboks (Stad:) tilgjengeleg i dialogvindauget for å opna filer. Dersom denne manglar, kan du få han igjen ved hjelp av tastekombinasjonen Ctrl + L eller ved å klikka på ikonet som viser papir og blyant oppe til venstre i vindauget.
|
|
Notat |
|---|---|
|
I dei aller fleste tilfella vil GIMP bestemma filtypen automatisk når du opnar ei fil. I nokre sjeldne tilfelle, særleg dersom filtypen er uvanleg eller dersom filnamnet er ufullstendig, kan det henda automatikken ikkje verkar. Du kan då opna Vel filtype og klikka på ønskt format. Den vanlegaste årsaka til at GIMP ikkje greier å opna ei biletfil, er likevel at fila anten er øydelagt eller at GIMP ikkje har støtte for dette formatet. |
Viss du vel å opna ei PDF-fil, vert det opna eit spesifikt dialogvindauge i GIMP for denne filtypen.
Du kan velja sider ved å skriva inn tal eller talområde skilde med komma. For eksempel vil 4-7,9 velja sidene 4, 5, 6, 7 og 9 i dokumentet. Standard er å velja alle sidene.
Viss dette er sett til Bilete, vil GIMP opna kvar av dei valde sidene som eit eige bilete. Er det sett til Lag, vil GIMP laga eitt bilete med kvar vald side som eit lag.
Storleiken på biletet vert bestemt av kva som er sett for Breidd, Høgd og Oppløysing. Eit PDF-dokument inneheld informasjon om breidd og høgd i einingar med fysisk lengde, så det gjev meining å setja breidda og høgda i pikslar og oppløysinga i pikslar per fysisk lengdemål.. Endrar du eitt av desse parametrane, vert dei andre automatisk endra tilsvarande.
Merk av i denne boksen for å bruka utglatting på tekst i biletet.
Viss du vel å opna ei PstScript-fil, vil GIMP opna eit ekstra dialogvindauge med innstillingar spesielle for denne filtypen.
Du kan velja sider ved å skriva inn tal eller talområde skilde med komma. For eksempel vil 4-7,9 velja sidene 4, 5, 6, 7 og 9 i dokumentet. Standard er å velja alle sidene. Merk: Dette er synleg berre om det er meir enn éi side.
Viss dette er sett til Bilete, vil GIMP opna kvar av dei valde sidene som eit eige bilete. Er det sett til Lag, vil GIMP laga eitt bilete med kvar vald side som eit lag. Merk: Dette er synleg berre om det er meir enn éi side.
Storleiken på biletet vert bestemt av kva som er sett for Breidd, Høgd og Oppløysing. Eit PostScript-dokument inneheld informasjon om breidd og høgd i einingar med fysisk lengde, så det gjev meining å setja breidda og høgda i pikslar og oppløysinga i pikslar per fysisk lengdemål.. Endrar du eitt av desse parameterane, vert dei andre automatisk endra tilsvarande.
Vel S/K for at GIMP skal laga biletet som eit indeksert bilete med to fargar. Grå for eit gråtonebilete eller Farge for eit RGB-bilete (sjå Del 1, «Bilettypar» for ei fullstendig forklaring på desse ulike modusane). Viss du vel Automatisk vil GIMP prøva å finna ut kva som er den mest høvelege modusen for det aktuelle biletet.
Viss det er merkt av for dette, vil GIMP bruka grensefeltinformasjonen i PostScript-fila for å bestemma kor mykje av sida som skal brukast: Dette svarar til faktisk å klippa bort blankteikn frå kantane på biletet. Det er mogleg for ei PostScript-fil å ikkje innehalda informasjon om grensefelt, i så fall vert dette alternativet ignorert.
Du kan velja at GIMP skal bruka kantutjamning separat for tekst og for grafikk i det importerte biletet. Du kan velja mellom anten Svak eller Sterk kantutjamning. I dei fleste tilfella bør du velja Sterk.