| 4.3. 이미지의 크기 바꾸기 (인쇄용) | ||
|---|---|---|

|
4. 자주 하는 편집 작업 |  |
| 4.3. 이미지의 크기 바꾸기 (인쇄용) | ||
|---|---|---|
|
|
4. 자주 하는 편집 작업 | |
As discussed before, pixels don't have a set size in the real world. When you set out to print an image on paper, GIMP needs to know how big each pixel is. We use a parameter called resolution to set the ratio between pixels and real-world units such as inches.
By default, most images open with the resolution set to 72. This number was chosen for historical reasons as it was the resolution of screens in the past, and means that when printed, every pixel is 1/72 of an inch wide. When printing images that are taken with modern digital cameras, this produces very large but chunky images with visible pixels. What we want to do is tell GIMP to print it with the size we have in mind, but not alter the pixel data so as not to lose quality.
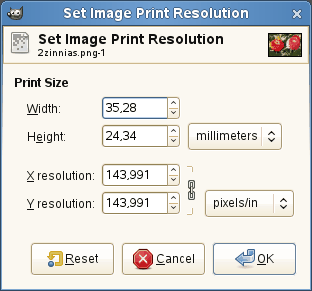
메뉴 막대에서 → 메뉴를 선택하여, “인쇄 크기” 대화 상자를 엽니다. 화면상의 크기 조정과 마찬가지로 너비나 높이를 바꾸면, 나머지 항목도 같이 바뀝니다. 그리고 이제 해상도값을 바꿉니다. 해상도값이 300 이상이면 이미지를 보기 좋게 인쇄할 수 있습니다. 하지만 150에서 200 사이면 픽셀이 조금씩 깨지는 것을 볼 수도 있습니다. 그리고 100 이하면 상당히 거칠게 인쇄가 되므로, 거리 표시나 큰 포스터처럼 멀리서 보는 용도로만 사용하는 것이 좋습니다.