| 2.2. New… | ||
|---|---|---|

|
2. 「ファイル」メニュー |  |
| 2.2. New… | ||
|---|---|---|
|
|
2. 「ファイル」メニュー | |
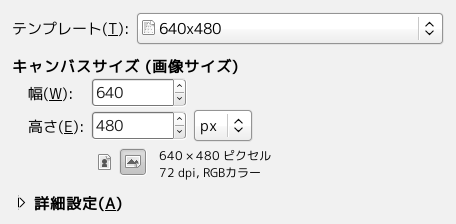
Using the 「Create a New Image」 dialog, you can create a new empty image and set its properties. The image is shown in a new image window. You may have more than one image on your screen at the same time.
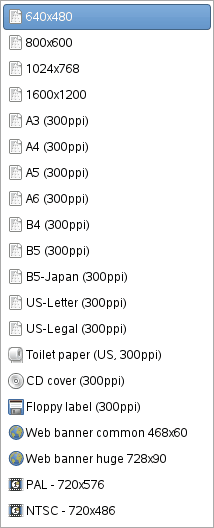
全部の値を手で入力しなくても、 テンプレートメニューからどれか定型を選ぶ方法があります。 ここには広く通用する画像の形式がいくつか入っていて、 画像の大きさや解像度などの値やコメントの雛形が利用できます。 画像作成でいつも使う定型設定がこのリストにない場合は、 テンプレート ダイアログを使えば新たに追加できます。
新しい画像については、 ここで 幅 と 高さ が設定できます。 既定の単位はピクセルですが、 すぐ隣りのメニューで他の単位にも切り替えられます。 ちなみにこのとき換算される大きさは X と Y の解像度 (詳細設定 で調節できる) によっても メニューで「ピクセル等倍」を有効にするかどうかによっても違いが出ます。
何も画像が開かれていない状態では無画像ウィンドウで「新しい」画像が開かれます。 何か他の画像を開いているときに (あるいは開いたあとで) 「新しい」画像を開くときは、 その画像の大きさに適した大きさの新たな画像ウィンドウで開かれます。
![[注記]](images/note.png)
|
注記 |
|---|---|
|
画像のいずれの画素もメモリー上に読み込まれる事実をいつも頭に置いておいてください。 高いビット深度で巨大な画像を作成すると、 GIMP でその画像に操作をするたびに莫大な時間とメモリーを消費します。 |
縦長と横長を切り替える 2 つのボタンが並んでいます。 これらのボタンは実質的には幅と高さを交換します。 (幅と高さが同じ場合はこれらのボタンは灰色無効になります。) X と Y の解像度が異なる場合 (「詳細設定」でそのようにも設定できる) は解像度も交換されます。 ダイアログではその右側に画像の大きさと容量、 解像度と色空間が表示されます。
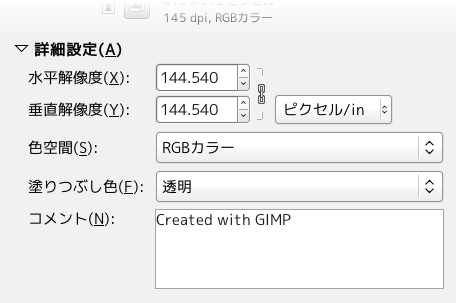
詳細設定 はもっと高度な GIMP ユーザー向けの内容です。 これらのオプションはダイアログの下寄りにある小さな三角形をクリックすると表示されます。
水平解像度 と 垂直解像度 の入力欄に入れた値は主として印刷に関係します。 画像の画素数を変えるのではなく、 印刷したときの実測的な大きさが変わります。 いずれの解像度も画素数からミリメートルやインチなどの距離単位に換算する土台になります。
![[ヒント]](images/tip.png)
|
ヒント |
|---|---|
|
画像の表示をいまの解像度に応じた大きさにするには、 画像ウィンドウのメニューで → を無効にします。 さらに表示倍率を 100% に設定すれば画像が正当な大きさの画面で表示されるはずです。 画面の正当な大きさの測定は通常 GIMP を導入した時点で行なわれますが、 画像が正しい大きさで表示されていない場合には GIMP で画面の変数を調節すべきかもしれません。 その手続は 設定 ダイアログの「ディスプレイ」のページで行なえます。 |
新しい画像は RGB かグレースケールの何れかの 色モード で作成できます。
お使いのコンピューター画面やテレビ画面でも利用されている赤・緑・青の 3 原色系で画像を作成します。
白黒や灰色濃淡のモードで画像が作成されます。 趣味でこのようなモノクロ画像にするだけのためにこのモードがあるのではなく、 いくつかのプラグインがこの画像形式を必要としています。 とはいえ GIMP なら RGB 画像をグレースケールに変換 する手段もあります。
このメニューから直にインデックス化カラー画像を作ることはできませんが、 もちろん画像を作成したらあとからいつでもその画像をインデックス化モードに変換できます。 画像ウィンドウのメニューより → → と進むと開かれる インデックスカラーに変換 ダイアログで変換しましょう。
A huge step for GIMP: 16-32 bits per channel support is at last available. You are now able to work with a lot more color information and detail in your pictures. This support basically gives you the ability to create super-smooth color transitions on your picture. Next improvement will be to have RAW files edited with GIMP directly since there is enough color space to bring back all the details that are stored inside a RAW file – however this is not implemented yet.
Five options are available:
8-bit integer
16-bit integer
32-bit integer
16-bit floating point
32-bit floating point
If you wonder what the difference is between integer and floating point (in the graphics area): If you have an image with 16-bit integer precision per channel, then you have 65.536 shades of different red, green and blue color tones – all of them equally stepped to each other (equal color distance). If you have it in floating point, then there are no equal-wide steps – so you can distribute the possible color values over selected ranges. For example: if you know that you have a very dark image with many shades of dark red color tones then you would benefit from floating point because you can decrease the importance of the brighter color tones and get most color detail out of only the darker reds.
図16.7 Precision example
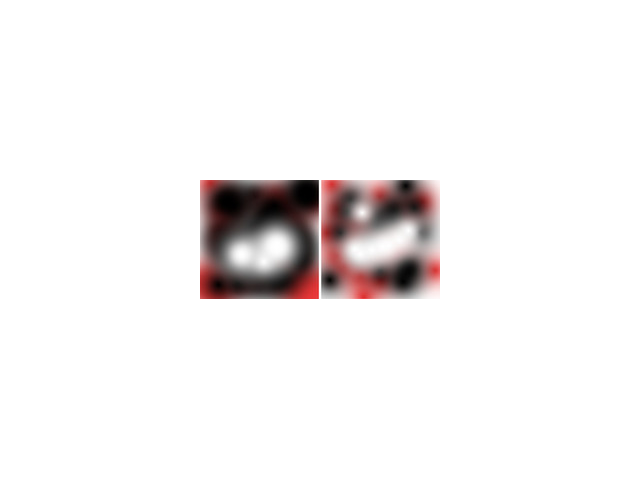
Left image is 8-bit, right is 32-bit. You can see that there are much more available colors between color transitions on the right image.
Here you can choose the channel encoding for your image. Choices are Perceptual gamma (sRGB) and Linear light. For 8-bit integer precision the default is Perceptual gamma, and for 32-bit floating point precision it is Linear light. For more information see which precision options should you choose.
When enabled (this is the default and should usually be left alone unless you know what you are doing), the image is color managed. This means that everything you do in GIMP will base their operations on the chosen color profile (see below) of your image. See for more information also Enable Color Management.
Here you can choose a color profile to be used for your image. The default is GIMP's standard color profile based on Color space, Precision, and Gamma. If you prefer to use a different color profile you can select an ICC color profile file from a location on your computer by choosing Select color profile from disk....
ここで新しい画像の背景色を定められます。 もちろん後からでも画像の背景色は変更できます。 その方法については レイヤーダイアログ で述べています。
つぎのようにさまざまな方法があります。
ツールボックスに示されている現在の で画像を塗りつぶします。
ちなみにこの描画色は「新しい画像を作成」ダイアログを開いている間も変更できます。
ツールボックスに示されている現在の で画像を塗りつぶします。 (背景色も同様に「新しい画像を作成」ダイアログを開いている最中でも変更できます。)
画像を で塗りつぶします。
画像に何も色を塗らず にします。 このオプションを選ぶと画像に アルファチャンネル が追加され、 背景レイヤーは透明になります。 画像ウィンドウでは透過している部分がわかるようにするため[初期設定では]市松模様が透けて見えます。
Fill the image with a Pattern. If you choose this option, the image is filled with the currently active pattern (which you can change while this dialog is open).
説明的な付記がここで書き込めます。 この文章は画像に パラサイト として埋め込まれ、 [XCF はもちろん] PNG や JPEG や GIF といったファイル形式で保存する場合に画像内に保存されます。 [PNG や GIF など一部のファイル形式はマルチバイト文字に対応していません。 このような形式で日本語文字を含んだ文を保存すると何の警告もなくコメント全文が削除されます。]
|
|
注記 |
|---|---|
|
このコメントは 画像の情報 ダイアログで閲覧と編集が可能です。 |