| 2. Главные окна | ||
|---|---|---|

|
Глава 3. Первые шаги с Уилбером |  |
| 2. Главные окна | ||
|---|---|---|
|
|
Глава 3. Первые шаги с Уилбером | |
The GIMP user interface is now available in two modes:
multi-window mode,
single window mode.
When you open GIMP for the first time, it opens in multi-window mode by default. You can enable single-window mode through → ) in the image menu bar. After quitting GIMP with this option enabled, GIMP will start in single-window mode next time.
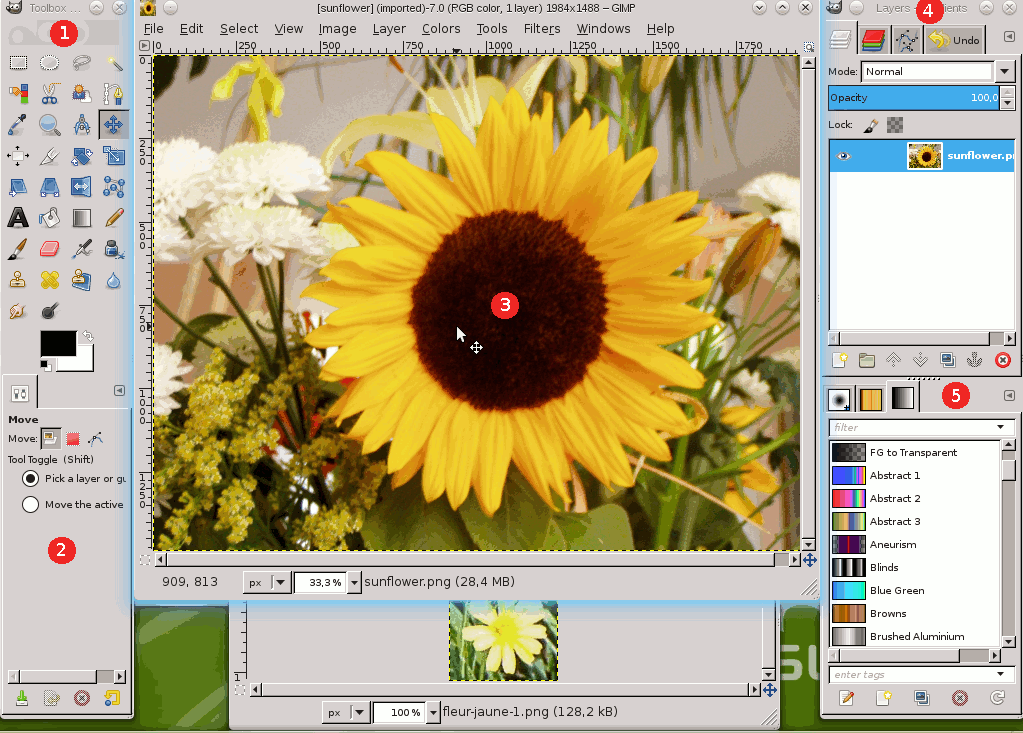
На иллюстрации выше представлено типовое расположение окон GIMP для эффективной работы.
You can notice two panels, left and right, and an image window in middle. A second image is partially masked. The left panel collects Toolbox and Tool Options dialog together. The right panel collects layers, channels, paths, undo history dialogs together in a multi-tab dock, brushes, patterns and gradients dialogs together in another dock below. You can move these panels on screen. You can also mask them using the Tab key.
The Main Toolbox: Contains a set of icon buttons used to select tools. By default, it also contains the foreground and background colors. You can add brush, pattern, gradient and active image icons. Use → → to enable, or disable the extra items.
Tool options: Docked below the main Toolbox is a Tool Options dialog, showing options for the currently selected tool (in this case, the Move tool).
Image windows: Each image open in GIMP is displayed in a separate window. Many images can be open at the same time, limited by only the system resources. Before you can do anything useful in GIMP, you need to have at least one image window open. The image window holds the Menu of the main commands of GIMP (File, Edit, Select...), which you can also get by right-clicking on the window.
An image can be bigger than the image window. In that case, GIMP displays the image in a reduced zoom level which allows to see the full image in the image window. If you turn to the 100% zoom level, scroll bars appear, allowing you to pan across the image.
The Layers, Channels, Paths, Undo History dock — note that the dialogs in the dock are tabs. The Layers tab is open : it shows the layer structure of the currently active image, and allows it to be manipulated in a variety of ways. It is possible to do a few very basic things without using the Layers dialog, but even moderately sophisticated GIMP users find it indispensable to have the Layers dialog available at all times.
Кисти/Текстуры/Градиенты: Панель, расположенная под диалогом слоёв, показывает диалоги управления кистями, текстурами, и градиентами.
Dialog and dock managing is described in Раздел 2.3, «Диалоги и панели».
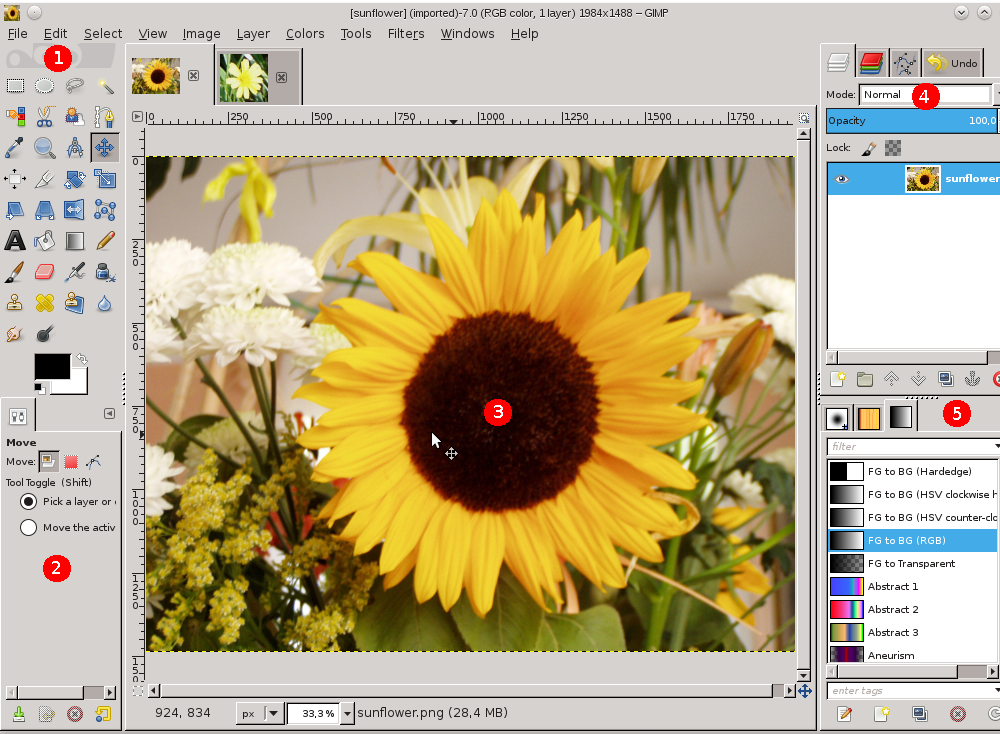
You find the same elements, with differences in their management:
Left and right panels are fixed; you can't move them. But you can decrease or increase their width by dragging the moving pointer that appears when the mouse pointer overflies the right border of the left pane. If you want to keep the left pane narrow, please use the slider at the bottom of the tool options to pan across the options display.
If you reduce the width of a multi-tab dock, there may be not enough place for all tabs;then arrow-heads appear allowing you to scroll through tabs.
As in multi-window mode, you can mask these panels using the Tab key.
The image window occupies all space between both panels.
When several images are open, a new bar appears above the image window, with a tab for every image. You can navigate between images by clicking on tabs or either using Ctrl+Page Up or Page Down or Alt+Number. «Number» is tab number; you must use the number keys of the upper line of your keyboard, not that of keypad (Alt-shift necessary for some national keyboards).
This is a minimal setup. There are over a dozen other types of dialogs used by GIMP for various purposes, but users typically open them when they need them and close them when they are done. Knowledgeable users generally keep the Toolbox (with Tool Options) and Layers dialog open at all times. The Toolbox is essential to many GIMP operations. The Tool Options section is actually a separate dialog, shown docked to the Main Toolbox in the screenshot. Knowledgeable users almost always have it set up this way: it is very difficult to use tools effectively without being able to see how their options are set. The Layers dialog comes into play when you work with an image with multiple layers: after you advance beyond the most basic stages of GIMP expertise, this means almost always. And of course it helps to display the images you're editing on the screen; if you close the image window before saving your work, GIMP will ask you whether you want to close the file.
![[Замечание]](images/note.png)
|
Замечание |
|---|---|
|
Если расположение окон в GIMP утеряно, то его можно легко вернуть с помощью команды → . Чтобы добавить, закрыть или отсоединить вкладку от панели, нажмите
|
Следующие разделы познакомят вас с каждым компонентом каждого из окон, изображенных на иллюстрации, разъясняя, для чего они и как работают. Прочитав эти разделы, а также раздел, описывающий основную структуру изображений GIMP, вы узнаете достаточно для выполнения основных манипуляций с изображениями. После этого можно почитать и остальные части руководства (или просто экспериментировать), чтобы изучить практически безграничное количество возможностей и тонкостей в работе с GIMP. Приятного чтения!
The Toolbox is the heart of GIMP. Here is a quick tour of what you will find there.
![[Подсказка]](images/tip.png)
|
Подсказка |
|---|---|
|
В панели инструментов, как и в большинстве элементов интерфейса GIMP, помещение курсора мыши над каким-либо элементом с задержкой на мгновенье обычно вызывает «подсказку», которая описывает этот элемент. В подсказке также часто показана клавиша быстрого доступа. Кроме того, в большинстве случаев для получения справки по этому элементу вы можете нажать клавишу F1, поместив перед этим курсор мыши над элементом. |
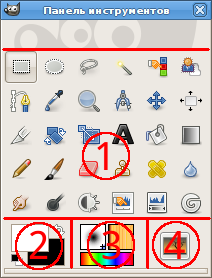
By default, only the Foreground-background icon is visible. You can add Brush-Pattern-Gradient icons and Active Image icon through → → : Tools configuration.
Пиктограммы инструментов: эти пиктограммы являются кнопками, активирующими инструменты для разнообразных действий (выделение частей изображений, рисование, преобразования и т.п.). Раздел Введение в панель инструментов описывает принципы работы с инструментами. Каждый инструмент описан в разделе Инструменты.
Цвета фона/переднего плана: область выбора цвета показывает текущие выбранные вами цвета переднего плана и фона, применяемые во многих операциях. Щелчок по одному из них вызовет диалог выбора цвета. Щелчок по двунаправленной стрелке поменяет местами цвета переднего плана и фона, а щелчок по небольшому символу в нижнем левом углу восстановит исходные значения цветов переднего плана и фона: черный и белый соответственно.
Brush/Pattern/Gradient: The symbols here show you GIMP's current selections for: the Paintbrush, used by all tools that allow you to paint on the image («painting» includes operations like erasing and smudging, by the way); for the Pattern, which is used in filling selected areas of an image; and for the Gradient, which comes into play whenever an operation requires a smoothly varying range of colors. Clicking on any of these symbols brings up a dialog window that allows you to change it.
Active Image: In GIMP, you can work with many images at once, but at any given moment, only one image is the «active image». Here you find a small iconic representation of the active image. Click the icon to display a dialog with a list of the currently open images, click an image in the dialog to make it active. Usually, you click an image window in multi-window mode, or an image tab in single-window mode, to make it the active image.
You can «Drop to an XDS file manager to save the image». XDS is an acronym for «X Direct Save Protocol»: an additional feature for the X Window System graphical user interface for Unix-like operating systems.
|
|
Замечание |
|---|---|
|
При каждом запуске GIMP выбирает инструмент (кисть), цвет, кисть и текстуру по умолчанию — всегда те же самые. Чтобы GIMP выбирал активный инструмент, цвет, кисть и текстуру, использовавшиеся в предыдущий раз, необходимо включить параметр «Сохранить параметры устройств ввода при выходе» в диалоге настройки программы. |
|
|
Подсказка |
|---|---|
|
Окно панели инструментов показывает «Глаза Уилбера» вверху диалога. Их можно спрятать, добавив следующую строку в файл |
|
|
Подсказка |
|---|---|
|
Drag and drop an image from a file browser into the Toolbox window to open the image in its own Image window or tab. |