| 8. GIH 대화 상자 | ||
|---|---|---|

|
7장. 김프로 그리기 |  |
| 8. GIH 대화 상자 | ||
|---|---|---|
|
|
7장. 김프로 그리기 | |
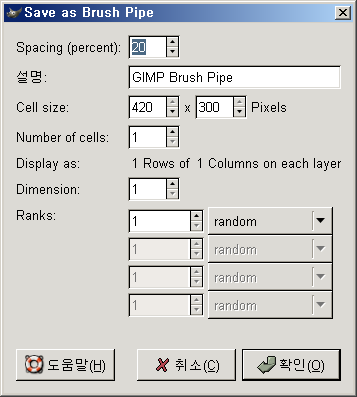
새 움직이는 붓을 만들고, 이를 gih 포맷으로 저장하려면 다음 메뉴를 이용합니다. → 파일의 확장자를 gih 로 설정한 뒤 저장 버튼을 누르면, 다음과 같은 창이 뜹니다.:
이 대화 상자에는 다소 어려운 몇가지 옵션이 있습니다. 이 옵션들을 통해 붓이 움직이는 방법을 결정하게 됩니다.
“Spacing” is the distance between consecutive brush marks when you trace out a brushstroke with the pointer. You must consider drawing with a brush, whatever the paint tool, like stamping. If Spacing is low, stamps will be very close and stroke look continuous. If spacing is high, stamps will be separated: that's interesting with a color brush (like “green pepper” for instance). Value varies from 1 to 200 and this percentage refers to brush “diameter”: 100% is one diameter.
붓 도구 대화 상자에서 격자 모드를 사용할 경우, 붓 선택시 나오는 붓 이름입니다.
레이어에서 잘라낼 셀의 크기입니다. 기본값은 레이어당 1 셀이며, 크기는 레이어의 크기입니다. 이 경우 레이어당 한 모양의 붓만 있게 됩니다.
큰 하나의 레이어에서 셀들을 잘라내 움직이는 붓의 각 붓로 사용할 수도 있습니다.
예를 들어 8개의 다른 모양을 가진 100x100 픽셀 크기의 붓을 만든다고 할 경우, 400x200 픽셀의 레이어에서 8개의 모양을 만들 수도 있고, 300x300 픽셀의 레이어에서 만들 수도 있습니다. 하지만 후자의 경우 셀 하나는 사용하지 않게 됩니다.
모든 레이어에서 잘라지는 셀의 총 수입니다(셀 하나는 붓 모양 한 개입니다). 기본값은 레이어의 수로 이 경우 붓 모양 한개에 하나의 레이어만 사용됩니다.
This tells how cells have been arranged in layers. If, for example,
you have placed height cells at the rate of two cells per layer on
four layers, GIMP will display:
1 rows of 2 columns on each layer.
이 부분은 굉장히 복잡하기 때문에 셀과 레이어가 놓이는 방법에 대해 자세히 설명을 할 것입니다.
GIMP starts retrieving cells from each layer and stacks them into a
FIFO stack (First In First Out: the first in is at the top of the
stack and so can be first out). In our example 4 layers with 2 cells
in each, we'll have, from top to bottom: first cell of first layer,
second cell of first layer, first cell of second layer, second cell
of second layer..., second cell of fourth layer. With one cell per
layer or with several cells per layer, result is the same. You can
see this stack in the Layer Dialog of the resulting
.gih image file.
그 후 설정한 차원 값을 가지고 배열을 만듭니다. 차원은 4차원까지 사용할 수 있습니다.
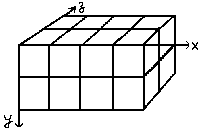
In computer science an array has a “myarray(x,y,z)” form for a 3 dimensions array (3D). It's easy to imagine a 2D array: on a paper it's an array with rows and columns
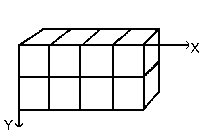
With a 3d array we don't talk rows and columns but Dimensions and Ranks. The first dimension is along x axis, the second dimension along y axis, the third along z axis. Each dimension has ranks of cells.
이제 김프는 스택에서 셀을 빼어 이 배열을 채우기 시작합니다. 배열을 채우는 방식은 횡렬의 왼쪽부터 오른쪽으로 채워가며, 횡렬의 오른쪽이 꽉 차면, 다시 횡렬의 첫번째로 돌아옵니다. 혹시 베이직 프로그래밍을 해본 적이 있다면, 배열(4,2,2) 가 다음과 같은 식으로 진행됨을 기억할 것입니다. (1,1,1),(1,1,2),(1,2,1),(1,2,2),(2,1,1),(2,1,2),(2,2,2),(3,1,1).... (4,2,2). 이에 대한 예제는 다음에 보겠습니다.
Besides the rank number that you can give to each dimension, you can also give them a Selection mode. You have several modes that will be applied when drawing:
GIMP selects a rank from the concerned dimension according to the order ranks have in that dimension.
GIMP selects a rank at random from the concerned dimension.
GIMP selects a rank in the concerned dimension according to the moving angle of the brush.
The first rank is for the direction 0°, upwards. The other ranks are affected, clockwise, to an angle whose value is 360/number of ranks. So, with 4 ranks in the concerned dimension, the angle will move 90° clockwise for each direction change: second rank will be affected to 90° (rightwards), third rank to 180° (downwards) and fourth rank to 270° (-90°) (leftwards).[2]
These options are for sophisticated drawing tablets.
예제
이제 실제적으로 이러한 것들이 어떻게 사용되는지 알아보겠습니다. 다음 예제들에서는 각 차원에 따라 붓이 어떤 움직임을 보이는지 보여줍니다.
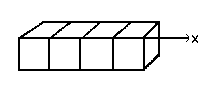
Let us start with a 1D brush which will allow us to study selection modes action. We can imagine it like this:
Follow these steps:
Open a new 30x30 pixels image, RGB with Transparent fill type. Using the Text tool create 4 layers “1”, “2”, “3”, “4”. Delete the “background” layer.
Save this image first with
.xcf extension to keep
its properties then save it as
.gih.
The Save As Dialog is opened: select a destination for your image. OK. The GIH dialog is opened: Choose Spacing 100, give a name in Description box, 30x30 for Cell Size, 1 dimension, 4 ranks and choose “Incremental” in Selection box. OK.
You may have difficulties to save directly in the GIMP Brush
directory. In that case, save the
.gih file manually into
the /usr/share/gimp/gimp/2.0/brushes
directory. Then come back into the Toolbox, click in the brush
icon to open the Brush Dialog then click on
 icon button. Your new brush appears in the
Brush window. Select it. Select pencil tool for instance and
click and hold with it on a new image:
icon button. Your new brush appears in the
Brush window. Select it. Select pencil tool for instance and
click and hold with it on a new image:
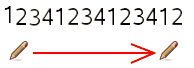
You see 1, 2, 3, 4 digits following one another in order.
Take your .xcf image file
back and save it as .gih
setting Selection to “Random”:
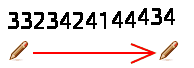
Digits will be displayed at random order.
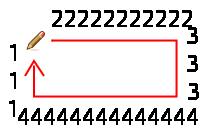
Now select “Angular” Selection:
이제 3차원 움직이는 붓을 만들 것입니다. 3차원 움직이는 붓의 방향은 칠하는 방향에 따라 바뀝니다. 여기서는 검정색과 파란색이 무작위로 나타나며 좌/우 손 모양이 규칙적으로 나타나는 붓을 만들 것입니다.
The first question we have to answer to is the number of images that is necessary. We reserve the first dimension (x) to the brush direction (4 directions). The second dimension (y) is for Left/Right alternation and the third dimension (z) for color variation. Such a brush is represented in a 3D array “myarray(4,2,2)”:

There are 4 ranks in first dimension (x), 2 ranks in second dimension (y) and 2 ranks in third dimension (z). We see that there are 4x2x2 = 16 cells. We need 16 images.
Creating images of dimension 1 (x)
Open a new 30x30 pixels image, RGB with Transparent Fill Type.
Using the zoom draw a left hand with fingers upwards.[3]
Save it as handL0k.xcf (hand Left 0°
Black).
레이어 대화 상자에서 레이어를 더블클릭해서 레이어 속성창을 호출합니다. 레이어의 이름을 handL0k 으로 바꿔줍니다.
Duplicate the layer. Let visible only the duplicated layer, select it and apply a 90° rotation (Layer/Transform/ 90° rotation clockwise). Rename it to handL90k.
Repeat the same operations to create handL180k and handL-90k (or handL270k).
Creating images of dimension 2 (y)
This dimension in our example has two ranks, one for left hand and the other for right hand. The left hand rank exists yet. We shall build right hand images by flipping it horizontally.
handL0k 레이어를 복제하고 새로 복제한 레이어만 보이게 합니다. 레이어 이름을 handR0K 으로 바꾸고 "레이어/변형/가로로 뒤집기" 를 적용합니다.
다른 왼손 레이어에 대해서도 똑같은 작업을 반복하여 오른손 레이어를 만듭니다.
Re-order layers to have a clockwise rotation from top to bottom, alternating Left and Right: handL0k, handR0k, handL90k, handR90k, ..., handR-90k.
Creating images of dimension 3 (z)
세번째 차원(z) 이미지 만들기): 세번째 차원은 검정색과 파랑색의 2개 열을 가지고 있습니다. 검정색은 이미 있으므로, 두번째 차원의 이미지들을 복제한 뒤 파란색으로 칠해서 파랑색 열을 만듭니다. 이제 총 16개의 이미지가 만들어질 것인데, 이를 다루기란 쉽지 않습니다. 먼저 두 개의 이미지 레이어를 가지고 해보겠습니다.
handL0k 레이어를 선택하고, 보이도록 설정합니다. "이미지/캔버스 비율 조정" 메뉴를 이용해 캔버스 크기를 60x30 픽셀로 변경합니다.
handL0k 레이어를 복제한 뒤, 채우기 도구를 이용해 손 모양에 색을 칠합니다.
Now, select the Move tool. Double click on it to accede to its properties: check Move the Current Layer option. Move the blue hand into the right part of the layer precisely with the help of .
Make sure only handL0k and its blue copy are visible. Right click on the Layer Dialog: Apply the command with the option Expand as Necessary. You get a 60x30 pixels layer with the black hand on the left and the blue hand on the right. Rename it to “handsL0”.
다른 레이어 대해서도 같은 작업을 반복합니다.
Set layers in order
Layers must be set in order so that GIMP can find the required image at some point of using the brush. Our layers are yet in order but we must understand more generally how to have them in order.There are two ways to imagine this setting in order. The first method is mathematical: GIMP divides the 16 layers first by 4; that gives 4 groups of 4 layers for the first dimension. Each group represents a direction of the brush. Then, it divides each group by 2; that gives 8 groups of 2 layers for the second dimension: each group represents a L/R alternation. Then another division by 2 for the third dimension to represent a color at random between black and blue.
다른 방법은 배열 표현을 이용한 시각적인 방법입니다. 두 방법의 상관관계는 다음 그림에서 볼 수 있습니다.
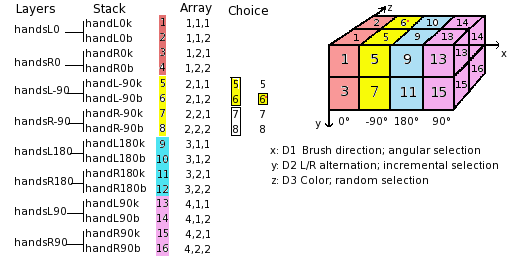
How will GIMP read this array?: GIMP starts with the first dimension which is programmed for “angular”, for instance 90°. In this 90° rank, in yellow, in the second dimension, it selects a L/R alternation, in an “incremental” way. Then, in the third dimension, in a random way, it chooses a color. Finally, our layers must be in the following order:

Voilà. Your brush is ready. Save it as
.xcf first, then as
.gih with the following
parameters:
Spacing: 100
Description: Hands
Cell Size: 30x30
Number of cells: 16
Dimensions: 3
1 차원 : 4 열, 선택 : 각도(Angular)
2 차원 : 2열, 선택 : 증분(Incremental)
3 차원 : 2열, 선택 : 무작위(Random)
Place your .gih file into
GIMP brush directory and refresh the brush
box. You can now use your brush.
그림 7.19. 붓을 이용해 타원 선택 따라그리기
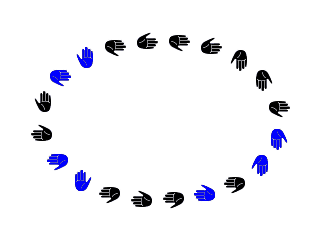
This brush alternates right hand and left hand regularly, black and blue color at random, direction according to four brush directions.
[2] For previous GIMP versions you may have to replace “clockwise” with “counter-clockwise”.
[3] Ok, we are cheating here: our hand is borrowed from http://commons.wikimedia.org/wiki/File:Stop_hand.png.