| 2.2. Image Window | ||
|---|---|---|
 |
2. Main Windows |  |
| 2.2. Image Window | ||
|---|---|---|
| |
2. Main Windows | |
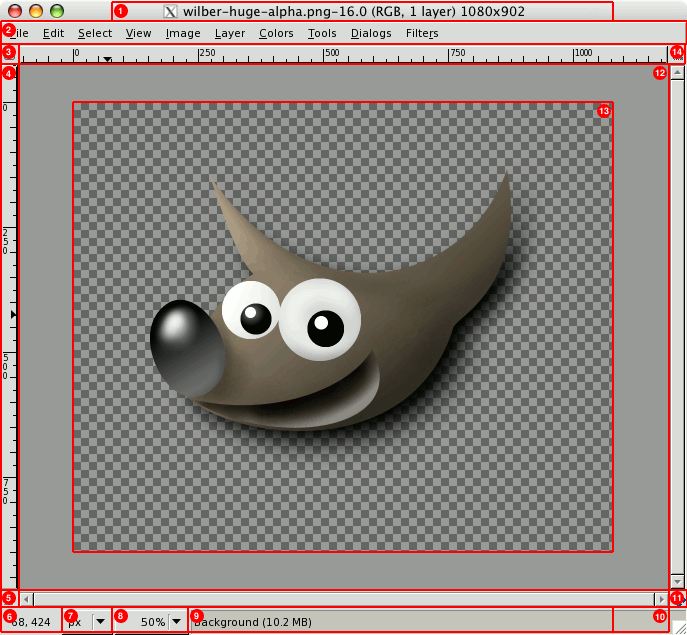
An image window exists, even if no image is open. The Title Bar in an image window without an image reads “GNU Image Manipulating Program”. An image window with an image displays the image name and its specifications in the title bar according to the settings in Preference Dialog. Each window displays exactly one image, or no image if no image is open. Each image is displayed in one or more image windows; it is unusual to display the same image in more than one window. We will begin with a brief description of the components that are present by default in an ordinary image window. Some of the components can be removed by using commands in the View menu.
Title Bar: The top of the image window typically displays a Title Bar with the name of the image and some basic information about the image. The Title Bar is provided by the operating system, not by GIMP, so its appearance is likely to vary with the operating system, window manager, and/or theme. Use the Preferences dialog to customize the information that appears in the Title Bar.
Image Menu: Directly below the Title Bar appears the Image Menu (unless it has been suppressed). The Image Menu provides access to nearly every operation you can perform on an image. You can also right-click on an image to display a pop-up image menu. [1], or by left-clicking on the little “arrow” symbol in the upper left corner, called the Menu Button:, if for some reason you find one of these more convenient. Many menu commands are also associated with keyboard shortcuts as shown in the menu. You can define your own custom shortcuts for menu actions, if you enable Use Dynamic Keyboard Shortcuts in the Preferences dialog.
Menu Button: Click the Menu Button to display the Image Menu in a column. If you like to use keyboard shortcuts, use Shift+F10 to open the menu.
Ruler: In the default layout, rulers are shown above and to the left of the image. Use the rulers to determine coordinates within the image. The default unit for rulers is pixels; use the settings described below to use a unit other than pixels.
One of the most important uses of rulers is to create guides. Click and drag a ruler into the image to create a guide. A guide is a line that helps you accurately position things—or verify that another line is truly horizontal or vertical. Click and drag a guide to move it. Drag a guide out of the image to delete it; you can always drag another guide into the image. You can even use multiple guides at the same time.
QuickMask Toggle: The small button in the lower left corner of the image toggles the Quick Mask on and off. When the Quick Mask is on, the button is outlined in red. See QuickMask for more details on this highly useful tool.
Pointer Coordinates: When the pointer (mouse cursor, if you are using a mouse) is within the image boundaries, the rectangular area in the lower left corner of the window displays the current pointer coordinates. The units are the same as for the rulers.
Units Menu: Use the Units Menu to change the units used for rulers and several other purposes. The default unit is pixels, but you can quickly change to inches, cm, or several other possibilities using this menu. Note that the setting of “Dot for dot” in the View menu affects how the display is scaled: see Dot for Dot for more information.
Zoom Button: There are a number of ways to zoom the image in or out, but the Zoom Button is perhaps the simplest. With GIMP-2.6, you can directly enter a zoom level in the text box for very fine control.
Status Area: The Status Area is at the bottom of the image window. By default, the Status Area displays the active part of the image, and the amount of system memory used by the image.Use → → → to customize the information displayed in the Status Area. During time-consuming operations, the status area temporarily shows the running operation and how complete the operation is.
![[Note]](images/note.png)
|
Note |
|---|---|
|
Note that the memory used by the image is very different from the image file size. For instance, a 70Kb .PNG image may occupy 246Kb in memory when displayed. There are two primary reasons the difference in memory usage. First, a .PNG file is compressed format, and the image is reconstituted in memory in uncompressed form. Second, GIMP uses extra memory, and copies of the image, for use by the Undo command. |
Cancel Button: During complex time-consuming operations, usually a plug-in, a Cancel button temporarily appears in the lower right corner of the window. Use the Cancel button to stop the operation.
|
|
Note |
|---|---|
|
A few plug-ins respond badly to being canceled, sometimes leaving corrupted pieces of images behind. |
Navigation Control: This is a small cross-shaped button at the lower right corner of the image display. Click and hold (do not release the mouse button) on the navigation control to display the Navigation Preview. The Navigation Preview has a miniature view of the image with the displayed area outlined. Use the Navigation Preview To quickly pan to a different part of the image—move the mouse while keeping the button depressed. The Navigation Window is often the most convenient way to quickly navigate around a large image with only a small portion displayed. (See Navigation Dialog for other ways to access the Navigation Window). (If your mouse has a middle-button, click-drag with it to pan across the image).
Inactive Padding Area: This padding area separates the active image display and the inactive padding area, so you're able to distinguish between them. You cannot apply any Filters or Operations in general to the inactive area.
Image Display: The most important part of the image window is, of course, the image display or canvas. It occupies the central area of the window, surrounded by a yellow dotted line showing the image boundary, against a neutral gray background. You can change the zoom level of the image display in a variety of ways, including the Zoom setting described below.
Image Window Resize Toggle: Without enabling this feature, if you change the size of the image window, the image size and zoom does not change. If you make the window larger, for example, then you will see more of the image. If this button is pressed, however, the image resizes when the window resizes so that (mostly) the same portion of the image is displayed before and after the window is resized.
![[Tip]](images/tip.png)
|
Tip |
|---|---|
|
Drag and drop an image into the Toolbox window to open the image in its own Image window. This is very different than dragging an image into an existing Image window, which adds it to the currently open image in a new layer—usually not what you want. |