| 4.4. Crop | ||
|---|---|---|
 |
4. Transform Tools |  |
| 4.4. Crop | ||
|---|---|---|
| |
4. Transform Tools | |
The Crop Tool is used to crop or clip an image. It works on all the layers of the image, visible and invisible. This tool is often used to remove borders, or to eliminate unwanted areas to provide you with a more focused working area. It is also useful if you need a specific image size that does not match the original dimensions of your image.
Just like the selection tools, the new crop tool has been enhanced with the v2.4 release. The resize handles actually resize the crop rectangle instead of providing both resize and move functionality. The tool behaves more naturally and consistently with other GIMP tools. To move, simply drag the rectangle clicking within the area. Resizing is possible in one or two axes at the same time dragging the handle-bars on the sides and corners. The outside area can be darkened with a nice passepartout effect to better get the idea of how the final crop will look like. To validate cropping, click inside the crop rectangle or press the Enter key.
When the mouse becomes the moving cross-hair, you can use the keyboard arrow keys to move the crop rectangle. Holding the Shift key down allows to move by steps of 25 pixels.
You can use Guides to position the crop area. Make sure that the → option is checked.
You can access this tool from the image-menu through: → → .
The Tool can also be called by clicking the tool icon:
 ,
,
or by using the Shift+C keys.
![[Tip]](../images/tip.png)
|
Tip |
|---|---|
|
A different and quicker way to crop selections is using the → function in the Image menu. |
The Shift+C shortcut will change the active tool to the Crop Tool.
When you maintain click on the crop rectangle, handles disappear and
holding down the Ctrl key toggles to the Extend from Center option,
holding down the Shift key toggles to the Fixed option, which makes some dimensions fixed.
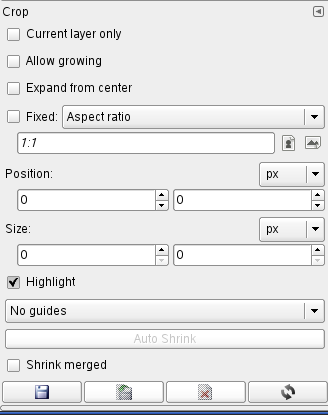
The available tool options for Crop can be accessed by double
clicking the Crop tool icon.
This option will make crop affect only the active layer.
This option allows the crop or resize to take place outside the image or layer boundary.
Figure 13.101. Example for “Allow Growing”
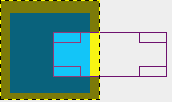
The option is checked: you can draw the crop rectangle outside the image border.

The resulting image has the same size as the crop rectangle. The area outside the original image limit is transparent.
When this option is checked, the crop rectangle expands from the first pixel you clicked taken for center. You can toggle this option with Ctrl while drawing the crop rectangle.
You can also access this option by holding down the Ctrl key while drawing the crop rectangle. This option offers you several to make drawing the crop rectangle respect fixed dimensions, or their ratio:
Aspect ratio: That's the default possibility. Width and Height keep the same ratio they have in the original image, when drawing the crop rectangle.
Width / Height: only Width or Height will remain fixed. The value of this dimension can be set in the text box below; it defaults to 100 pixels.
Size: both Width and Height will be fixed. Their values can be set in the text box below, in the form “150x100” for example. The crop rectangle will adopt this values as soon as you click the image. On the right, two buttons let you choose a (widthwise) or (upright) format for the crop rectangle.
These two text boxes show the position (horizontal on the left, vertical on the right) of the upper left corner of the crop rectangle in real time and you can change it manually too. It is stated in pixels, but you can change the unit thanks to the drop-down list of the button. The coordinate origin is the upper left corner of the canvas (not of the image).
These two text boxes show the size (horizontal on the left, vertical on the right) of the crop-rectangle in real time and you can change it manually too. It is stated in pixels, but you can change the unit thanks to the drop-down list of the button.
This option toggles the dark outside area intended for highlighting the crop rectangle.
All kinds of guides are described in Section 2.2, “ Rectangle Selection ”
The Auto Shrink button will attempt to locate a border, in the active layer, from which to draw dimensions from. This option only works well with isolated objects contrasting sharply with background.
Figure 13.102. Example for “Autoshrink”

An image with a sharp limit in it and a crop rectangle.
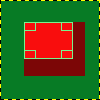
After clicking the Autoshrink button, the crop rectangle has been shrunk to fit the sharp limits.
This option works the same, with Auto Shrink or not. It uses the pixel information from all visible layers, rather than just from the active layer.